Showing posts with label blogging. Show all posts

Monday, October 20, 2008

Placing a Custom Header on your Blog

So you don't like the plain options that blogger offers for headers? Would you like to create your own? This is the post for you. Whether you choose to scrap a header, or make one digitally, this tutorial will walk you through the steps you need to create a header that looks crisp, and fun.
If you choose to physically create (scrap) a header, you will need to either scan your finished product, or photograph it. Either way, you should be sure to crop out any background showing behind your image. Nothing says homemade, and not so professional, more than carpet on your header. :)
When I scrap my header, I usually do it on a surface that's about 3-4 inches high, and 12 inches wide. Then I crop my photo in Picnik.com. I usually create headers digitally using Scrapblog.com.
First, you'll need to check to see how wide your blog is. Go into your CUSTOMIZE or LAYOUT section, and click on the EDIT button for your header in the PAGE ELEMENTS.

This window will tell you what size to make your header if you want it to fit inside your borders. If you don't want to worry about fitting inside your borders, you can usually go a bit wider, and simply eliminate the borders mis fit by making your border color the same as your background in EDIT FONTS AND COLORS. When you create your header, if you choose to write your title in the image you create, you need to choose the INSTEAD OF option when you load your header.

Here is the header I started on Scrapblog.com, and then saved to my computer. Then I took the image to Picnik.com, to finish editing it. While in Picnik, I cropped the header image to fit better into the spot I want it in. Scale the photo, and then put in your dimensions. I chose 900X200 for my header's size.

Then I took the cropped image, and played with a few features, added text, added a frame around it, and saved it to my computer. In Picasa3, I changed the image to black and white, and added a glow to it.

Now I'm ready to add it to my blog! I open the edit header section again, and find the image on my blog. Then I choose to use my image instead of title and description. This doesn't erase the information there, it just tells blogger that visually, I don't want to include Blogger's text. Because I've played with my template, and I have three columns, I know that my header can be wider than the template thinks it can be, so I don't choose to have blogger re size my photo. I don't personally think that blogger is very smart at resizing photos, so if I know that I need to fit my image into the area provided, rather than have blogger re size, I do the resizing myself, and I make my image 10 pixels smaller than the width blogger gives. That way, my image fits evenly inside the border. Save your changes when your photo is finished loading, and you are done!

© Rachel Whetzel Please do not use content or images without written permissions.

Multiple photos in a Blog Post

You've probably noticed, that when you post photos to blogger, you can only load 5 at a time. I'll be showing you how to load more than that, and also, how to move those photos within your post when they have loaded.
To start, you should open up a NEW POST window. Then you'll select the photo button that looks like a mountain and sky scene.

In the new window that pops up, you'll see the screen for loading your photos.
In that window, there are several things you'll want to notice.
1. The ADD ANOTHER PHOTO button. Choosing this button will allow you to choose up to five photos to load at a time.
2. The BROWSE button lets you choose photos from your computer to be loaded to blogger. You'll need to know where your photos are stored on your computer to be able to find them.
3. The placement options NONE, LEFT, CENTER and RIGHT. This will create code in your HTML view of your blog post, telling computers where to place your photos within the screen. Choosing Left, Center or Right will create code that you will have to fight later, if you choose to move your photos. I find it easier to choose NONE, and then later, if I need to, choose the alignment by using the align options at the top of the post editing box.

4. The last place you need to pay attention to, is your photo's size, and whether or not you'd like blogger to remember your settings each time you post. I use large photos, and opt to have blogger remember my settings.

By default, all photos loaded to your post will automatically be put at the top of your post. You can move them easily, but right clicking on the photo you'd like to move, and choosing CUT.

Then, move your curser (the blinking line that shows you where your text will go next when you are in your post editing box) to the place you'd like your photo. Then paste your cut photo back into your post, by right clicking and choosing paste, OR hitting CTRL + V on your keyboard.

Remember to give your photos their own lines in your posts, but hitting ENTER before and AFTER you place them in your post, so that your text doesn't wrap strangly around them. To add more than five photos, simply repeat the process of adding the first five, as many times as it takes for you to have added all the photos you need in your post!

© Rachel Whetzel Please do not use content or images without written permissions.

Saturday, October 11, 2008

Branding

What exactly IS branding? Branding is a marketing tool, that when used properly, can help you create a "brand" for your blog.
It's really pretty simple when it comes to blogging and your "brand". Things like color, things like a tag line, things like profile photos... all those things create a BRAND.
Even here, on this blog, I've chosen colors and a scheme that is more simple than, but mimics the colors I have on my main blog. So that when people click to view my tutorials, they know they are still in MY world.
According to Wikipedia, A good brand name should:
  • be easy to pronounce
  • be easy to remember
  • be easy to recognize
  • be easy to translate into all languages in the markets where the brand will be used
  • attract attention
  • be attractive
  • stand out among a group of other brands
Some of these things are applicable, even if just as a suggestion in your personal branding on line.
Some areas that you might brand yourself on line.
  • Your Blog's Title Try making it catchy, a play on words, or simply easy to remember. Some blogger's use their names. The key is, you want people to be able to TALK about you easily. The easier it is for them to mention you to a friend, and give your blog title without a pen and paper, the better. The same applies to your Blog's URL.
  • Your Signature line This can be a saying or line that you always have at the end of your posts... maybe your signature. I have both.
  • Colors on your blog. Use the same colors, in your fonts, and banners... even if the banner changes, keep the colors similar, or have the same photo on it.
  • Profile photos. USE YOUR FACE. People want to know YOU. Using your face on your blog profile photo, on message boards, on forums, will all work to help you gain a recognizable face. Even better if you use the SAME photo in all those places.
  • Picking a "theme" for all your blog sections. (on mine, I liked the idea of having peeps cheep, when they left a comment, so I ran with the chicken/farm/coop theme.
Think about what makes your blog YOURS. Think about what makes bloggers like Ali Edwards so easy to recognize. It's the branding. It's something you need, no matter how small you are. It's something that lends credibility to you. It's something that draws new readers, and new traffic to your blog. If you look put together, people will come.
Think about things before they go on your blog.
Some things that distract from a good brand, and leave people feeling like you may be "just a stay at home mom"
  • Dated or FAD templates. Stay away from dated or "fad" looking elements unless that date is one that is part of your branding strategy. Blogger isn't MySpace. Having a blog that looks like that's where it belongs may turn readers away.
  • Too many blinkies and buttons and THINGS going on. That's not to say you can't have great links, and other things on your blog, BUT think about what brands from OTHER people you want to allow to take up visual space. If it's just an idea you love, or another's blog that you like, you may be better off to simply place a LINK rather than an image link (or blog button) The fact is, that sites with blinkies available to you, are really more interested in the LINK from your blog to their area of the web that they are about the fact that you didn't use the image they provided.
  • Un organized sidebars. It's very distracting when a reader comes to read your blog, if your sidebar isn't organized. If you have your profile in an "odd" area, or if you have no rhyme or reason to how things are listed in your link lists. Take advantage of blogger's options to edit your gadgets in your sidebar. Use the SORT ALPHABETICALLY option, or organize by importance to YOU by using the up/down arrows in the edit mode to move newly added items to their place in your lists. Make your lists in an organized fashion. Simply listing EVERYTHING on the web that you love isn't a great way to get other's to look where you'd like them to. Create SECTIONS of links... blogs I read, sites I get inspiration from, sites I'm a member of, shops I shop at. That sort of thing.
  • Headers that are poorly photographed. EDIT EDIT EDIT, folks!! It's very easy to crop the edges of a header, so that your carpet doesn't show around the edges. It's very easy to wait until day time, and take a clear, crisp photo in the natural light. Not taking the time to do so, tells your reader that you might take the same haphazard approach to other things. Like blogging.
No matter how much or how little you decide to take branding seriously, it's something to think about, and apply. It's easy and free, and all it takes is a little thought.

© Rachel Whetzel Please do not use content or images without written permissions.

Setting up your Settings

Once you have your blog created, and you're ready to get down to business, there are some things in your settings you may or may not want to change.
At this time, you should open your SETTINGS page. It's the center "tab" of the three brown tabs at the top of the page. From here on out, I'll refer to them as tabs. Just below the tabs, are links written in blue. They break down into what I will call "sub" tabs from here on out.
FIRST, you'll want to put a description into your blog. This can be your tag line, or a desscription of what's on your blog... whatever it is, will usually show in feeds and feed readers like Bloglines.
SECOND, you need to think about whether you want your blog to be public or private. Public blogs are blogs that anyone who knows your blog address can find. Private blogs allow you to have all your readers come to view your blog by invite only. You can change either setting at either time, so it's not life or death, whichever you choose! lol One thing that you can do, while keeping your blog "public" but at the same time discouraging "strangers" from your blog, is to choose to keep your blog from certain areas of the web. You do this in the BASIC sub tab in your SETTINGS area.
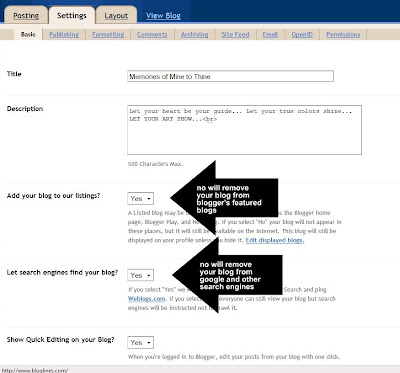
By default, most of the settings on the BASIC sub tab are set where you'll want them.
Still in SETTINGS, on your PUBLISHING sub tab, you'll see the option to purchase your own domain. If you already OWN a domain, you can host a blogger blog on your website here. I purchased my domain name through blogger, and from behind the scenes, it's no different from the way it was before. The transformation was pretty seamless, and totally simple on my end.
THIRD, you will go to the sub tab in SETTINGS: FORMATTING.
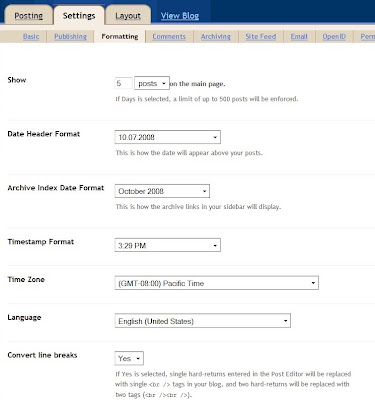
In Formatting, you can choose how many posts show on your home page, choose the way your date stamps look on posts, how your posts are archived. These are all things that you can come back at any time and change. Choose what you like now, and if you change your mind, they will change without any trouble! For the most part, in this area also, the default settings are pretty often just fine. FOURTH on our stop, is COMMENTS.
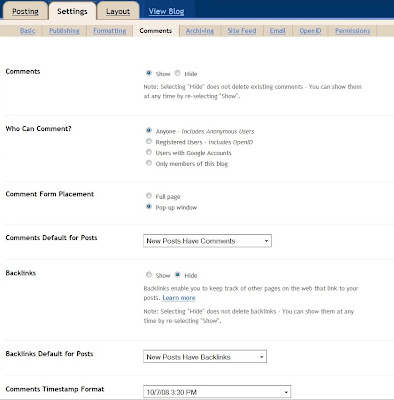
Let's look at things a little closer. Top of the page, is

This SHOW/HIDE feature lets you decide if you want people to be able to comment on your posts. This area is what I would call your default area. If you want to change individual posts ability to accept comments, you can do that when you are posting. Choosing hide will make it so that your readers cannot leave a comment.
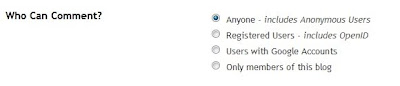
The next section of COMMENTS gives you choices for who is allowed to comment on your blog. In my experience, those who might choose to either spam your comments section (leave comments with links, and adds, with no interest in your blog) or flame your blog (leave bullying comments, or speak in inflamatory tones.) will find ways around the registered users and users with google accounts. They will create dead end ID's and leave what they want. It's also my experience, that these people are few and far enough in between, that I can easily keep tabs on my comments, and delete anyone I decide is spam or flaming.
On down the page, you can choose how comments will display on your blog. It's up to you, what you'd like.
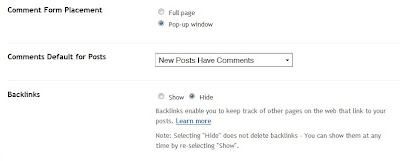
I have my comments saved as a pop up window, because I like my readers to be able to leave a comment without leaving my blog.
Backlinks. I actually have mine listed as show. This will list blogs that have linked to specific posts on my blog, and in the blogging world. Such linking encourages traffic, as well as cross promotion of people who are posting about you!
Further on down the page, is the rest of your comment settings.
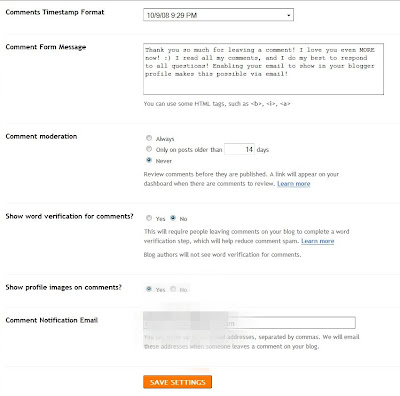
You can put a custom greeting in your comment box, that will show when people click to leave a comment. You can select whether you'd like comment moderation, (to approve comments on your blog before they show) require word verification or show profile images on your comments. My personal preference for these, is to have no moderation. I get an email every time someone comments on my blog, and I'm happy to delete any comments that I don't want on there. Since I started my blog, I've probably had less than ten such comments. They are easy to get rid of, and moderation, for me, is more of a hassle than a help. I also choose not to have word verification on my blog. I don't like having to enter all those letters myself, so I don't ask my readers to. I choose to take care of automated or bot comments after they are posted, and delete them. As for showing photos in comments, I do. I like having a face to go with a name with I read my comments.
Lastly in the comment area, I like to get emails when I get comments, so I don't have to check my blog like a crazy woman, because let's face it. I totally would. So I put the email address I'd like to get emails at in the box, and they magically come to my inbox!!
FIFTH tab, is Archiving. This is the area where you'll decided how often you want your blog to store old posts. That's entirely up to you, and can be changed anytime you want.
SIXTH sub tab, is your FEED. A feed is the method that feed readers find your blog. It's how your viewers can get updates when you post, without visiting your blog. They can chose to use readers like Bloglines, or get emails through services like Feedburner.
SEVENTH, if you'd like to get an email with the content you posted, you can have an email sent when you post in the EMAIL sub tab. You can also set up an email "address" to send emails from your email box to your blog.
EIGHT sub tab is OPEN ID. Open Id allows users with typepad, wordpress, livejournal, and other blogging platforms to use their ID, and information to leave you a comment! I use it. It's up to you if you like that or not. It's really just a way to encourage users to leave a trackable way for you to visit them in return for their comment, and that sort of thing.
NINTH and last. PERMISSIONS. This is the area you let blogger know who can view your blog. You can invite people to contribute to your blog without giving them your log in information here also. It's not a place you'll most likely be in a lot, but it's handy to know about it! :)
So that's where I'll leave you today. Play with your settings and figure out what you'd like for YOU.

© Rachel Whetzel Please do not use content or images without written permissions.

Starting a Blog

Welcome!! I thought I'd start at the beginning. The VERY beginning. I use blogger, so my tutorials will all be based on that. I'm not in any way shape or form a representative for Google or Blogger. I'm just sharing what I know about blogger with you! I like blogger, because it's free to use, and you do not have to have a gmail email address to have a google account. To get started, go to Blogger's Home page. http://blogger.com (or click on the link I provided you)

You'll want to click on the big orange button that says CREATE YOUR BLOG NOW...

OR if you already have a google account, OR gmail, you can just sign in with that email and password once you click the orange button.

If you already have a google account, or a gmail email address (as in youremail@gmail.com) then you click on the blue SIGN IN FIRST button at the top right of the page. Once you've signed in, the first option you have is to create a blog title. Your blog title is NOT your blog's address on line, (URL) so you can put whatever you'd like here. People usually try to out cute eachother here... :)

Be sure you put something better than * or ~ as your title. Whatever you have in this spot, is what will show up in the TAB of browsers. * or ~ doesn't say a lot. Here's a view of what I'm talking about. Once upon a time, before headers were simple, these titles helped users when they added custom headers, but not any more. I'll explain more later.

Once you have a title, you need to choose the address for your blog. If your title is long, you might want to choose something more simple. For example, My blog's TITLE is Memories of Mine to Thine. My Blog URL only has MinetoThine in it. In my opinion, a nice short title, that's easy to remember is good. I chose mine to thine, because it echoed my blog's title, and made it easier for my family and readers to remember. Some people use their names. It's nice to remember too, that your title and your URL don't HAVE to match. If you think you'll be changing your TITLE, around a lot, you may want to choose your name as your URL. That way, people will be able to find you easily. I never planned to change mine, so I made them similar. This is also the first step to something called BRANDING, but we'll talk about that more at a later time.
The next step you'll take, is choosing your template.

By default, blogger chooses Minima. This is the best template for making changes to your blog when you want to create things like two sidebars... you have freedom to change colors and fonts in ALL blogger templates. Minima is also a good template for blogs if you choose to use a template for blogger made by someone else. Be CAREFUL when you are using templates NOT provided by blogger. Most of them use code that you paste into the EDIT HTML option of your management area, and most of them will wipe out your widgets. (all those neat little spots that you can create link lists, and blog buttons) IF you want to play with templates outside blogger, the only place I recomend, is The Cutest Blog on the Block. Their templates are placed into a widget, through your page elements area, and you will NEVER lose any widgets using their templates. Well, this wraps up my first tutorial!! Your blog is created!! We'll get into some more basics in a bit.


© Rachel Whetzel Please do not use content or images without written permissions.
Thursday, October 9, 2008

Fighting Spam

Tired of getting those emails from places you've never heard of? One reason you may be getting these emails, AKA spam, is because you may have written your ACTUAL email address in a comment somewhere on line, or even on your own blog. Thing is, that there are computers that "crawl" the internet looking for the @ symbol and a .com or .net and when they find them, they know that they have found an email address to spam.
SO
if you need to leave your email address in written form on a web page, then simply type it out in long form!! Like this: rachelzinbox-mail at yahoo dot com. Most people will know that the at and dot should be changed to actual punctuation. IF you want to have an easy access button for people email you easily with, you might try http://konactr.com and create a free web based email form. Your email stays hidden from on line bots, and you use your regular email address to create your account. All mail is forwarded to that email by kontactr, and you are even given a nifty little button to put in place of an email link!! Good stuff, I'm telling you.

© Rachel Whetzel Please do not use content or images without written permissions.

Monday, October 6, 2008

Enable EMAILS, People!!

If you use blogger, you need to read this. If you've ever commented, and wondered why people who use blogger don't reply to you... it's not because we are snobs. It's because we CAN'T. In blogger, when you want to be informed of comments made on your blog, there is a spot in your manage settings section to do that. If you need to view any of these photo closer, just click on them.
Go to SETTINGS, and then COMMENTS:

Then scroll down to the bottom of that page and put the email that you would like to receive emails at. Save.

So now, you've enabled emails when folks comment...
BUT
Blogger doesn't have that handy dandy email feature that just about every other blog host has. When you recieve those emails, you'll get them via NOREPLY. You won't be able to reply to them unless you can figure out where they blog, and sometimes, it's a bit awkward to reply to a comment WITHIN a comment!!
BUT
There is a solution to this!! IF you have blogger... go to your dashboard.
Click on EDIT PROFILE

When you are in your profile, select the SHOW EMAIL option. This doensn't actually SHOW your email address on line. If you'd rather not have your primary email address be shared as a reply email when you leave a comment, you can change the address in the EMAIL ADDRESS box. This will make the address that "shows" (in other words is listed in your reply email and is inserted if people want to email you through your profile) the email of your choice. Save your changes.

NOW when you or anyone else views your profile, they will see a link to email you, and when you leave a comment, NO REPLY will be replaced with an email address!! This way the blogger whose blog you left that comment on will be able to REPLY to you!! No more blog tag back and forth!!

SEE???

So YOU don't use blogger? YOU have a different platform for blogging!?!?
Then be sure to tell Blogger that when you leave your comment!! Choose OPEN ID and put your information into blogger's comment box. I won't be able to email you a reply, but I WILL be able to find your blog.

Your blog platform isn't listed in OPEN ID? Maybe you have your own website? Maybe...
:::gasp:::
You don't have ANYTHING...
Then choose NAME/URL.
Type in your website or blog address. If you don't have a blog or web site, leave that spot blank!!

Hope that you learned something, and that you are able to try making the changes you can to help other bloggers talk back when you talk to THEM! If you'd like to help spread the word about this, feel free to blog about what I have written, and link back to my post!! Here is a direct link back to this post for you. http://minetothine.blogspot.com/2008/05/public-service-announcement.html


© Rachel Whetzel Please do not use content or images without written permissions.